vue+element-plus+router
vue create hello-vue
cd hello-vue
vue add element-plus
vue add router
axios
npm install --save axios # 安装后可以在package.json中查看安装的版本
在@main.js中添加如下注释两行
import { createApp } from 'vue'
import App from './App.vue'
import installElementPlus from './plugins/element'
import router from './router'
import axios from "axios"  // 引入

const app = createApp(App).use(router)
installElementPlus(app)
app.config.globalProperties.axios = axios // 将axios挂载到全局变量,后面可以通过 this.axios 调用

app.mount('#app')
在vue.config.js文件中,加入如下内容,解决跨域问题
如果是从自己的后端获取数据,不建议用这个,而是直接改后端,因为打包编译成HTML部署,还是不能跨域,还是需要从后端解决根本问题
module.exports = {
  publicPath:'./',//静态资源包打包为相对路径
  outputDir:'dist',//输出文件
  devServer:{
      open:false,
      host:'0.0.0.0',
      port:8090,
      hot:true,
      proxy: {
          '/api': {
            target: 'http://blog.gm7.org/', // 需要请求的第三方接口地址
            changeOrigin: true, // 是否跨域:在本地会创建一个虚拟服务端,然后发送请求的数据,并同时接收请求的数据,这样服务端和服务端进行数据的交互就不会有跨域问题
            ws: true,  //是否代理 websockets
            secure: false,  //是否https接口
            pathRewrite: {  // 路径重写,
              '^/api': ''  // 替换target中的请求地址,也就是说以后你请求/api就等于请求http://t.weather.sojson.com/。
            }
          }
      },
  }
}
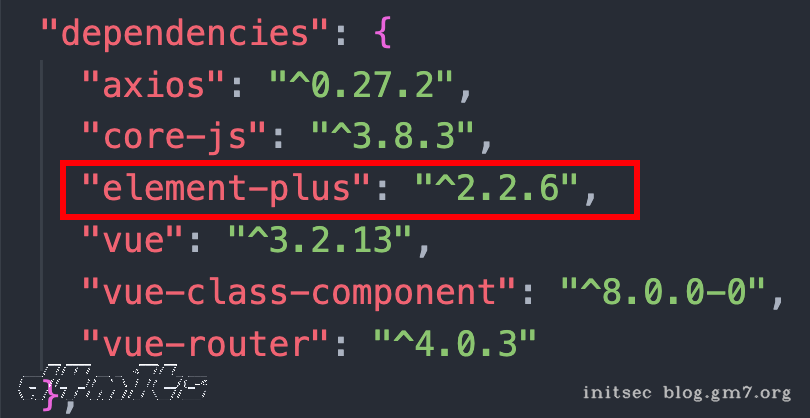
更新element-plus版本
默认的版本是 "element-plus": "^1.0.2-beta.28",导致很多组件用不了
我们需要修改package.json,来更新element-plus的版本,可以从github上查看最新版
比如我现在最新版是 ^2.2.6
在 @plugins/element.js中,修改原来的import为
import 'element-plus/dist/index.css'
import locale from 'element-plus/es/locale/lang/zh-cn'
再执行 npm install 更新组件
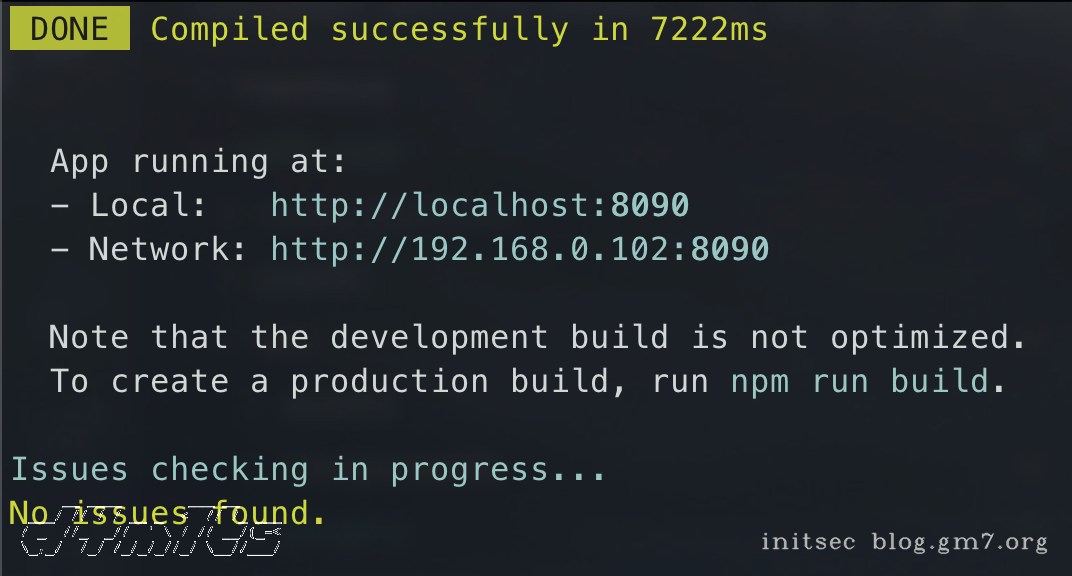
运行
npm run serve
为了避免后面新建项目重复操作,项目模板已经放到github
补充
代码高亮
npm install --save highlight.js
npm install --save @highlightjs/vue-plugin
引用只需要在main.js中引入就行,代码内容如下:
[!tip]
各主题样式可以在 https://highlightjs.org/static/demo/#Atom%20One%20Dark 看
import 'highlight.js/styles/atom-one-dark.css'
import 'highlight.js/lib/common'
import hljsVuePlugin from '@highlightjs/vue-plugin'

app.use(hljsVuePlugin)
使用方法:
<highlightjs language="html" :code="dialogMessage"/>
<highlightjs autodetect :code="code" />
API
一般先单独写到一个js文件里面
// 前置URL
const frontUrl = "/v1"

// github相关
const githubFrontUrl = `${frontUrl}/github`
const githubFetch = `${githubFrontUrl}/fetch`
// token相关
const tokenFrontUrl = `${frontUrl}/token`
const tokenFetch = `${tokenFrontUrl}/fetch`
const tokenAdd = `${tokenFrontUrl}/add`
const tokenDel = `${tokenFrontUrl}/fetch`
const tokenUpdate = `${tokenFrontUrl}/update`
// task相关
const taskFrontUrl = `${frontUrl}/task`
const taskFetch = `${taskFrontUrl}/fetch`
const taskAdd = `${taskFrontUrl}/add`
const taskDel = `${taskFrontUrl}/fetch`
const taskUpdate = `${taskFrontUrl}/update`

const api = {
    githubFetch,
    tokenFetch,
    tokenAdd,
    tokenDel,
    tokenUpdate,
    taskFetch,
    taskAdd,
    taskDel,
    taskUpdate
  }

export default api
然后再导出,在main.js中引入后,加载到全局变量即可
import api from './config/api'
app.config.globalProperties.api = api
后面就可以用this.api来获取地址了
echarts
- 教程
参考官方文档
- 用例
建议直接复制粘贴抄:https://echarts.apache.org/zh/index.html
[!note]
选择按需引入,引入相关的组件后,直接复制
option代码内容即可注意:在使用Echarts时我们数据一般不是静态写死的,而是通过后端接口动态获取的,在此介绍总结两种在vue框架下Echarts使用动态数据的方式。
- 方法一:通过
computed- 方法二:在data中定义
option(可以直接给setup改成data),通过在初始化之前,直接改变option对应属性值 数据变化后需要再次调init方法刷线图表
1点经验
- 不要想着一个组件到另一个组件用传参数的方式传数据过去,而是应该全部用
data()设置变量来赋值和读值。